In contrast to what many of us choose to believe, wet-dry vacuums aren’t made to be used in commercial settings only.
Granted, for the first few years of their existence, the utility of these vacs was limited to heavy-duty jobs. However, with manufacturers designing wet dry vacs in compact sizes these days, you’re as likely to see these cleaners in a domestic environment as in a workstation.
And why should you know how to use a dry-wet vac?
They can make your life a whole lot easier. You can use them to pick up anything from spilled liquids to a bunch of scattered nails. Also, whether your clogged toilet has overflowed or your house’s water pipe has broken down, knowing how to use a wet-dry vac which could save you from costly water damage.
How to Use a Wet-Dry Vac
Before we set our sights on the main procedure, it’s important for you to know about the parts attached to a wet-dry vacuum. Once you know how they work, only then you can be sure that you can use them in a manufacturer-designated way.
Parts of a Wet-Dry Vac
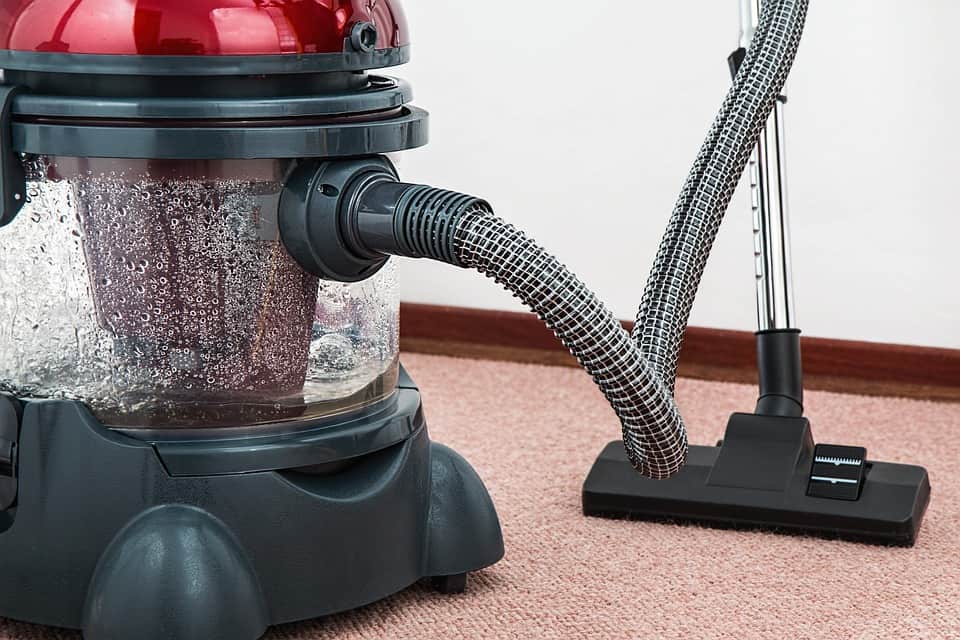
The most important parts of a wet-dry vacuum are as follows:
- Vacuum Tub: As the name implies, the vacuum tub is that part of your vacuum which holds everything the cleaner sucks in – be it liquid spills or dry debris.
- Hose: A hose picks up dirt or debris from outside by relying on the suction power created by the vacuum’s pump. It is connected to the vacuum’s tube.
- Nozzle: Attached to the edge of the hose, you can think of the nozzle as the part which bends over dirt, dust or water and sucks them inside the vac.
- Pump: The pump of a dry-wet vac works in a similar fashion as your average water pump. It produces the required power to remove the collected water from inside the vac.
- Cables: Similar to those of your average domestic or commercial vacuum, the cables of wet-dry vac power it by connecting it to the electrical outlet. However, they are supposed to be waterproof.
The Working Procedure
Regardless of whether you own a small, medium or big sized vacuum – and it doesn’t matter as well as to which company the vac belongs to – most of the wet-dry vacs you see on the market have a similar working procedure.
Here’s how you can use a wet-dry vac:
Step 1: Setting up the machine
First things first, it should go without saying that to work properly, a wet-dry vac needs to be placed on a flat surface. Otherwise, it might not be able for the machine to generate the required suction to pick up dirt and water.
When setting it on a flat surface, make sure that there is an electrical connection nearby. However, if your model is battery-operated, then there’s no such compulsion. Place the vacuum at or close to the area you intend to clean.
Step 2: Removing dry filter (optional)
Assuming that you want to clean a liquid spill, start by opening the top which covers the vacuum’s tube. Remove the dry filter, place it outside and then put the tube back. You’re doing it to create extra capacity for the liquid inside the vac.
Remember, you’re removing the dry filter because you want the vac to collect liquid. However, if it is dry dust and debris that you intend to clean, leave the dry filter on and follow the upcoming steps.
Step 3: Connecting the hose
Once you have removed the filter, connect the hole. There should be a hole in front of the vacuum for you to hook up the hose.
However, if you cannot find its spot at the front, look for the hose’s hook at other parts. If your search still proves unfruitful, you might want to turn to the instruction manual to determine the exact position of where to connect the hose.
Step 4: Attaching the nozzle
After attaching the hose, connect the nozzle at its edge. Make sure that the nozzle is attached tight otherwise water leakage might occur later on.
After you’ve made sure that the connection is tight enough, plug in the power cord and turn on your vacuum cleaner.
Step 5: Start cleaning
Assuming you’ve done everything right by now, the nozzle of the vacuum should start sucking in all the water stuff you might be pointing it on.
Once you’re done with the cleaning or the tub is full, stop the process. Otherwise, if you continue to try to clean even when the tub is full to capacity, you might end up damaging the motor.
Final Step: Remove collected water
To remove the collected water, turn around the vac and unscrew the tap which is located on its rear side. Doing that will lay bare a hole – put the pump on it and ensure that the connection is as tight as possible.
Next, to the other side of the pump, attach a long pipe through which the collected water will be removed. Then, plug in the power cable and tap “Start” button of the pump for it to start removing water from the wet-dry vac.
Conclusion
As you might have guessed by now, using a wet-dry vac – once you become aware of the technicalities – is almost as easy as using your car vacuum. However, when it comes to the benefits that wet-dry vacs offer by removing both wet and dry messes, not many cleaners out there can compete with them. Consequently, if you deal with both these type of messes all the time, it’s time you choose a wet-dry vac suiting your requirements.